Self-contained Components

James K Nelson
James is the editor of React Armory, and has been creating things with JavaScript for over 15 years.
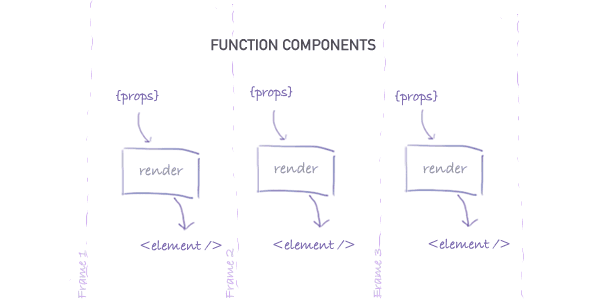
Read more by JamesFollow @james_k_nelson on TwitterOne of the great things about React’s function components is that they’re declarative. Instead of forcing you to update the DOM step by step, function components let you say “I want these props to result in this element” – and then it’s all good!
Of course, being declarative means that everything must be passed through props. And this is usually a good thing; it forces you to separate business logic from view logic, making your components magically reusable. But the props still have to come from somewhere…
Why Store State?
Function components are no good by themselves. They need information (sometimes called state) to be fed to them through props. And the larger your app grows, the more code you’ll need to feed this state through.
Take this timer for example. Even though the TimerDisplay component and Timer class are imported from a library, it still takes 5 lines of code to connect them:
But consider that in the real world, the TimerDisplay would be nested within many levels of components. Just like this one:
Yep, this article is a React Component! You can inspect it using the React Dev Tools.
This timer is nested within 14 (!) other components at the time of writing – starting with React Armory’s root Application component, which nests components that handle routing, which nests components that handle page layout, which nests components that render the article itself, which then nests a TimerDisplay component.
And nobody wants to manually pass objects through 14 levels of props.
The thing is, it isn’t always practical to pass all of your state down from the application root. But function components don’t give you any other choice. They’re too dumb; they can’t do anything except render outside information.
But what if there was a way to create smart components that manage their own state? Components that could implement business logic and communicate with the outside world…
Two Types Of Components
One of React’s defining features is that it allows you to create custom element types, called components. And while so far this guide has focused on defining components with functions, React also lets you define components with classes.
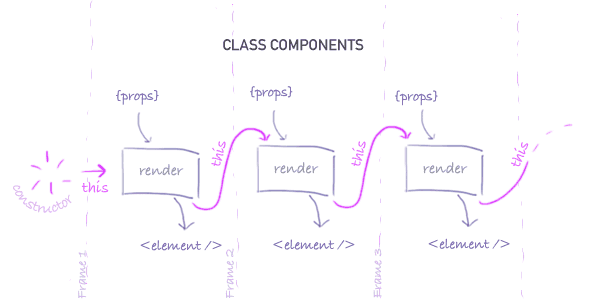
But why have two types of components? Well, as you know, function components are a little limited. All they know about is their current props. They can’t access previous props or external state. And they’re only re-rendered when their parent is; they can’t be re-rendered individually.
In contrast, class components give you the power to store state, communicate with the outside world, and re-render whenever you’d like. But class components can be simple, too! In fact, any function component can also be implemented as a class component.
So how do I define class components?
You just wrap a function component in a class! There are only three rules you’ll need to follow:
- The class must extend from
React.Component - Your method that returns a React Element must be called
render() - Props are accessed through
this.propsinstead of through function arguments
The best way to understand this is to see it in action, so let’s take a look at some real components.
In this example, there are two components that do exactly the same thing – they center text. The only difference is that Center1 is defined as a function, while Center2 is defined as a class:
Function components and class components can look pretty similar. In fact, a function component is basically just the render() method from a class component, with this.props passed in as an argument.
But if the two types of components are so similar, how is it that class components can be so much more powerful?
Functions vs. Methods
Have you ever thought about the difference between a function and a method? At the surface level, the two concepts are almost identical. And indeed, functions and methods both do basically the same thing. But there is one major difference. Do you know what it is?
Methods have access to an object called this.
Functions only have access to whatever information is passed in via arguments.
At first, this might not seem like an important distinction. But it has an important consequence. While function components can only access their current props, methods can store information on this and access it on subsequent renders.
Classes are just classes
One thing to understand about class components is that they’re just JavaScript classes.
This means that there is nothing special about the render() method; it’s just a method that React calls when it wants to render the component.
It also means that there is nothing special about this; it’s just a JavaScript object. You can set values on this. And then you can read them back later.
In fact, React classes are so unremarkable that it can be hard to believe that they’re just classes. But seeing is believing, and that’s why it’s time for an exercise!
In this exercise, you’ve been provided with two counters. The counter labeled “Expected” shows the number of times that renderApp() has been called. The other counter, labeled “Actual”, shows “-1”.
Your task is to make the “Actual” counter match the “Expected” counter, by converting the SecondCounter component into a class component, and incrementing this.count on each render. Once you’ve completed it, compare your class with my solution. But only once you’ve completed it, otherwise you won’t learn anything!
And there you have it! Class components are just classes. They can do anything a class can do. And unfortunately, classes can’t actually do all that much…
Rerendering revisited
Imagine for a moment that you want to set some state each time the user clicks a button. For example, you might want to set this.time = 0 when the user clicks the timer’s “reset” button. Which will work… kind of. The thing is, while the instance variable will change, React won’t actually render the change.
Remember how I mentioned back in Rendering and Re-rendering that React will only re-render when you call ReactDOM.render()? In the context of class components, this becomes problematic. You don’t want every component in your application to depend on some global function that re-renders your entire app.
Luckily, I was lying when I said that React only re-renders on ReactDOM.render(). Because React also re-renders when you call a component’s setState method.
The setState method
One of the rules of React component classes is that they must extend from React.Component. As a result of this, your classes will inherit a bunch of methods – the most important of which is setState.
When you call this.setState(state) from within your class, the following will happen:
- The properties of the passed in
stateobject will be copied ontothis.state(butthis.statewon’t change immediately – more on this later) - React will then re-render your component and its nested components
Simple, right? There are just two things to be careful of:
You can’t use
setStatewithin therendermethod. This is because callingsetStateresults in a re-render, so callingsetStatewithinrenderwould result in an infinite loop.You can’t use
setStatewithin your class constructor. This is a little less obvious, but I assure you that there is a good reason – which we’ll get to in a bit.
Of course, you’re probably more interested in what you can accomplish with setState. And the answer is that…
setState makes self-contained components possible
What do I mean by self-contained? Well, by calling setState from your event or timer callbacks, you can save any information that you receive directly to the component instance. Your state no longer needs leave the component at all!
This is one of the most important concepts in React, so it would be irresponsible of me to not say please oh please actually do this exercise.
Let’s try setState
In this exercise, your task is to implement a self-contained component. I’ve started you off with a component that half works – you’ll need to finish it by adding some calls to setState.
But where do you need to call setState? You can figure it out by using this rule: your component only re-renders when this.props or this.state change.
Actually, the component won’t re-render if you directly set this.state instead of setting it with setState. So my rule isn’t 100% precise. Deal with it.
This means that if you want your component to re-render when a certain piece of information changes, you’ll need to save that information with setState.
Once you’ve completed the exercise, you should have two working timers – and you should be able to start/stop the timers independently.
If you do run into any trouble, you can check my solution below. And remember – if you check the solution without giving it a go first, you’re a dirty cheat!
If you’re reading this, I’m assuming you’ve given the exercise a decent crack and got the timers working one way or another, so congratulations! setState is the bread and butter of your business logic, so using it will soon become second nature.
And while we’re on the topic of the exercise, did you notice how I used a constructor? This shouldn’t be too much of a surprise – after all, class components are classes, and classes have constructors. But it does raise the question: how are your components actually instantiated?
Component Instances
If you’ve worked with JavaScript classes before, you’ve probably created class instances with new MyClass(). But while class components are classes, you should never actually use new on them. Instead, you’ll pass your classes to React.createElement() and let React handle instantiation for you.
And this raises the question: when does React actually instantiate your components? This question can be a bit tricky, but is also a good way to check your understanding of React so far. So have a little think about it before checking your answer below.
React creates new component instances when it first creates a DOM node for an element.
This means that React does not create a new instance when you call React.createElement(). Remember that React.createElement() only describes what to render, while ReactDOM.render() actually updates the DOM.
While function components are called on each render, a class component only needs to be instantiated on its first render. On subsequent renders, React will just update this.props and then call render(); it won’t create a whole new component instance.
In a way, class components are like function components that receive a special this prop.
React treats two elements with different key props as different, even if the component type is the same. This means that if you change a component’s key, React will discard the instance and instantiate a new one.
And that answers the question of when components are instantiated. So let’s go back to the original question: how? And the answer is: React just calls new MyComponent(props). Which in turn calls your class’ constructor. Simple, huh?
But why does the constructor receive props?
Constructors
When a class instance is first instantiated by JavaScript, it will be completely empty. Instance variables like this.props and this.state will be undefined. And it’s the constructor’s job to initialise them.
But that doesn’t mean that you need to write a constructor for every component!
One of the oddities of JavaScript classes is that every constructor in the entire inheritance chain must be called. And that means that a class that extends another class must call super within the constructor (if it has a constructor).
Remember how component classes extend from React.Component? Because of this, React is able to provide a base constructor that sets this.props to the passed in argument. You’ll never need to set this.props yourself.
Of course, sometimes you’ll want to perform other initialisation, and that’s where custom constructors come in.
By giving your class a custom constructor, you’re able to specify code that should run before your component does anything else. This has countless uses, but there are two in particular that I often see in the wild: setting initial state, and binding event handlers. So let’s take a look at these in detail.
Setting initial state
React doesn’t give this.state a default value; initially it is undefined. So if your render method uses state, you’ll make your life easier by setting an initial state in the constructor. There’s just one problem: setState doesn’t work in the constructor.
Luckily, if you’re in the constructor, you don’t need to use setState! You can simply set a value:
constructor(props) {
  super(props)
  this.state = {
    // initial properties
  }
}
React doesn't instantiate components unless it needs to render them.
In general, you don’t want to directly set this.state like this; you should use setState to ensure that your component will be re-rendered. But within a constructor, you know that a render is already scheduled. This means that setState is unnecessary, and a simple assignment will suffice.
Binding event handlers
You’ll often find that your event handlers need to call this.setState, which in turn means they need access to this. And this probably seems painfully obvious, but there is a good reason for saying it:
In JavaScript, methods are not guaranteed to have access to this.
Consider this component:
At first glance, it looks like we’ve passed the reset method to TimerDisplay as an onReset callback. But if you actually click the “RESET” button in the preview window, you’ll find that the reset method isn’t a method at all; it doesn’t have access to this!
To test your understanding of this, let’s do a little quiz: can you explain the reason that this doesn’t exist? Spend a few moments on this, then check your answer below.
In a JavaScript method, the value of this has nothing to do with the class on which it was defined. Instead, it depends on the object that it was called upon.
In terms of . syntax, this means that if you call obj.someMethod(), the value of this within someMethod will be obj – regardless of where someMethod was originally defined! If you just call someMethod() without using a ., this will be null.
There are two important exceptions:
- You can force a specific value of
thiswith a function’scall,applyandbindmethods - If the function is an
=>arrow function,thisis hard-wired to refer to the value ofthisat the location where the function was defined
None of these exceptions apply in the above example, and you don’t know how reset is called (because it is called within the TimerDisplay component). As such, you have no idea what this will be!
My explanation of this is a bit like high school chemistry; it’s a nice idea but it may give an expert a heart attack.
If all you want to do is use React, it is probably good enough. But otherwise go read the details at MDN.
How’d you go? Don’t worry too much if you’re a little confused; this is confusing, even for the experts. But there is one important thing that you need to remember:
Once you’ve passed a method as a callback, you have no idea how it will be called, and thus no idea what this will be.
Unless, of course, you use an => arrow function or force this to a known value with bind.
Arrow functions vs. bind
You may have noticed that in the examples above, the callbacks we passed to TimerDisplay were all defined as arrow functions. This has the benefit of ensuring that this is available, but it also has a problem: it can be a major performance drag.
The problem here is that each time an => is encountered, it creates a new copy of the arrow function. And in JavaScript, creating functions is a costly operation.
To get around this, React developers will often replace all of their event callbacks in the constructor with bound versions, like so:
If you’re building your source with babel or create-react-app, you can avoid writing bind in your constructors by defining callbacks with property initializer syntax. For example:
class Timer extends Component {
  reset = () => {
    this.setState({ time: 0 })
  }
}
constructor() {
  // Replace `this.reset` with a copy of it, where `this` is forced to
  // refer to your component instance
  this.reset = this.reset.bind(this)
}

reset() {
  this.setState({ /* ... */ })
}
By using bind this way, you’ll ensure that this behaves as you expect it to, while also avoiding the performance issues inherent in arrow functions.
A real-world example
Class components give you a lot of options: setState, constructors and method binding to name a few. Of course, the problem with options is that you need to know how to actually apply them. So let’s take a look at how classes are used in practice.
This example takes the timer from the previous exercise and re-implements it in a more typical fashion. There are two major changes:
- The callbacks have been moved out to separate methods (which are bound in the constructor)
- An initial state has been set in the constructor
The TimerContainer component from the above example is a typical React component; I wouldn’t be surprised to see something like this in a real application. The only thing that it doesn’t do is clean up after itself – which is a big problem that we’ll get to in a moment.
What other types of components can you build with component state? Here are a few ideas:
- Form components can store their current value in state
- Data fetched from an API with can be stored with state
- Pagination, filters and orders can be stored in state, then used to select which part of the props to display
- Animations can use state to find the time elapsed since the previous frame
Speaking of animation, this guide has been conspicuously lacking in animated fractals. So…
Let’s create a component!
Now that you know about component state, you know everything that you need to create an animated tree component like the one from way back in part one. If you need your memory jogged, here it is again:
But where to start? Well, do you remember the TreeBox component (also from part one)?
Consider that a swaying tree is really just a tree whose lean prop cycles from one value to another as time passes. And given that you now know how to add a timer to a component, all that’s left is to convert a time to a lean.
A teensy bit of math
You can skip this section if you already know how to use Math.sin(time) to cycle between two numbers.
To make the tree sway, you’ll need to cycle the lean prop between roughly -0.5 and 0.5 as time passes. But how do you turn an ever-increasing number like time into a cycling number? With trigonometry functions, of course! And in particular, with Math.sin().
Seeing is believing, so here’s an example that uses a Scope component to show how the value of Math.sin(time) changes over time – press START to see it in action.
And now that you know how to make a point sway, all that is left is to make your entire tree sway!
To start you off, I’ve created component that draws a static tree. To finish the exercise, you’ll need to do the following:
- Create a
Timerinstance in the constructor - Set the
leanprop based on the value of the timer - Add a callback method for the button (and bind it in the constructor)
- Set the button text appropriately
Good luck! As always, you can check the solution if you get stuck or if you’d like to compare your answer with mine. But do give the exercise a fair go first.
Did you make the tree sway? Then congratulations! setState is one of the most important parts of React. It’s all down hill from here!
Of course, while state is important, there is still a lot to learn – and there are still a lot of ways to mess things up.
Tips & Gotchas
Class components are a powerful tool. And precisely because they are powerful, you’ll need to exercise some caution using them.
Here are a few particular things you should keep in mind, starting with the golden rule of state:
If you don’t need state, don’t use it
State adds complexity to your component. And while necessary complexity is… necessary, unnecessary complexity is going to come back and haunt you.
Practically speaking, this means that if you can compute something from props instead, you should do so. The only time you should cache a computation in state is when you’ve measured a significant performance benefit from doing so.
Set initial state within the constructor
If you don’t set this.state, it defaults to undefined. So if your component makes use of state, you’ll make your life a whole lot easier by setting an initial value in the constructor. And remember – in the constructor, you don’t need to call setState. Simple assignment is fine:
constructor() {
  this.state = {
    // initial state
  }
}
Not everything is re-rendered
Calling this.setState(...) won’t re-render the entire application; it will only render the current component and its children. Of course, only re-rendering the current component if often a lot faster than rendering the entire application, so you can use this to your advantage when tweaking performance.
Changes are not immediate
Calling this.setState(...) won’t immediately update this.state. Instead, it’ll schedule an update which will occur sometime before the next repaint, but probably not before the method that called setState finishes executing. If you need to know when the update completes, you can pass a callback.
Don’t set state within render
A class component’s render method is for rendering. All it should do is figure out how to convert this.props and this.state into a React Element. That’s it.
But with this said, sometimes you do need to set some state after each render. And React provides a way to do this, called lifecycle methods. And we’ll get to them in a moment.
Clean up after yourself
You should not call this.setState(...) after your component has unmounted. If you do, React will get very angry and will log an error to your console.
But wait a moment… how do you know when your component is unmounted? Actually, given what you currently know, you don’t know when the component is unmounted.
In fact, this is a problem that you’ve already encountered: the Timer component used throughout this article will never stop calling this.setState, even if the component is unmounted. And this is kinda really bad. But how do you fix it? With lifecycle methods!
Lifecycle methods
Lifecycle methods are React’s way of notifying class components about things that are about to happen to them – like mounting, unmounting, rendering, and receiving new props.
But how do you use lifecycle methods? Find out in the next episode of Learn React By Itself. And by next, I mean the one after this brief introduction to JSX. Because typing React.createElement is bloody annoying, amirite?